After setting up limits in KPIs, you can then subscribe to be informed, or "alerted", when a KPI reaches a certain limit, and whether it is good, bad, or for reference purposes only.
In short, alerts are limits which have been set to quickly inform the user when a limit has been reached in a KPI, and if so, is it good or bad?
| 1. | In the Home tab menu, click Alerts (under the HIP heading). The KPI - Alerts tab opens with all available limits/alerts listed in a table. |
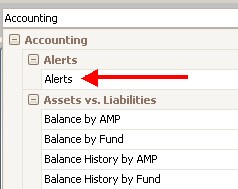
Hint: Alerts can also be selected from the KPI selection drop-down menu, listed under their KPI group (Accounting, Maintenance, Housing). After selecting "Alerts," the available alerts for that KPI group display in a table where you can then subscribe/unsubscribe to them.

| 2. | Check the checkboxes in the subscribe column of the limits you to which you want alerted. |
| 3. | Click |
- To unsubscribe to an alert, uncheck the appropriate subscribe column checkbox and click
.
- If you want to edit a limit, access the appropriate KPI, click the Setup Limits link located at the bottom, left-hand corner of the tab, and edit the limit information in the KPI Limits window that appears.
| 4. | You can now easily and quickly view when a limit has been reached in a KPI, and if so, is it good or bad, on the KPI - Alerts tab by clicking Alerts in the Home tab menu at any time. |
Hint: To exit out of an individual screen or tab, you can click ![]() on the toolbar, or
on the toolbar, or ![]() next to the screen/tab name. You can also use the Escape (ESC) key on your keyboard. (If you haven't saved any changes before exiting, a message will appear asking if you'd like to save before closing.)
next to the screen/tab name. You can also use the Escape (ESC) key on your keyboard. (If you haven't saved any changes before exiting, a message will appear asking if you'd like to save before closing.)
Copyright © Tenmast Software 2011